本教程是由Lynda机构出品的Houdini骨骼动画技术高阶训练视频教程,3DBuzz Technical Rigging Houdini Volumes 1-5,时长:10小时,大小:4.1 GB,MP4高清视频格式,附工程源文件,教程使用软件:Houdini,作者:Scott Pagano,共115个章节,语言:英语。
Houdini 是一个特效方面非常强大的软件。许多电影特效都是由它完成:《指环王》中“甘道夫”放的那些“魔法礼花”,还有“水马”冲垮“戒灵”的场面,后天中的龙卷风等等,a52的汽车广告,反正只要是涉及DD公司制作的好莱坞一线大片,几乎都会有Houdini参与和应用。
Houdini不光只适用于视觉特效的制作,随着HOUDINI适用于各种平台,并且出现了很多的HOUDINI培训教学,HOUDINI开始进入了动态图像设计领域。因为其自身的流程化特性,加上其强大的动力学系统,让HOUDINI在数据可视化方面占有一席重要的地位,让图形设计师能够通过它表达自己的观点。
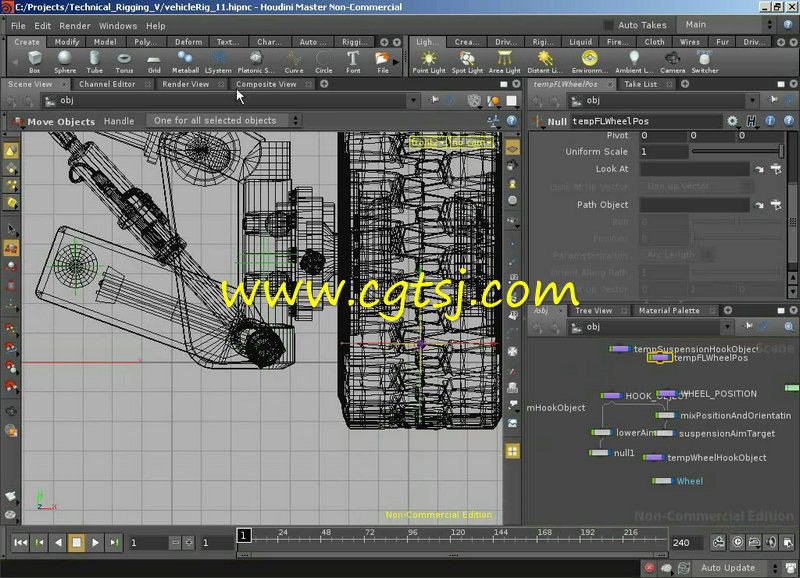
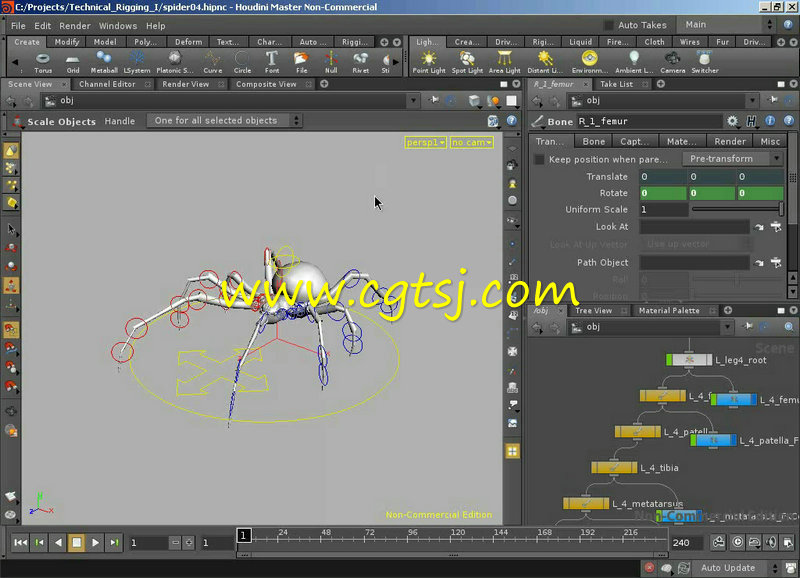
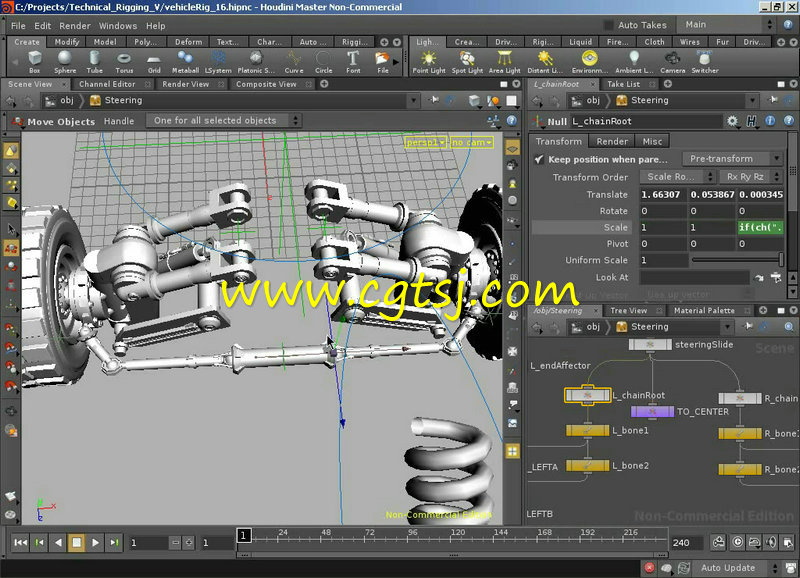
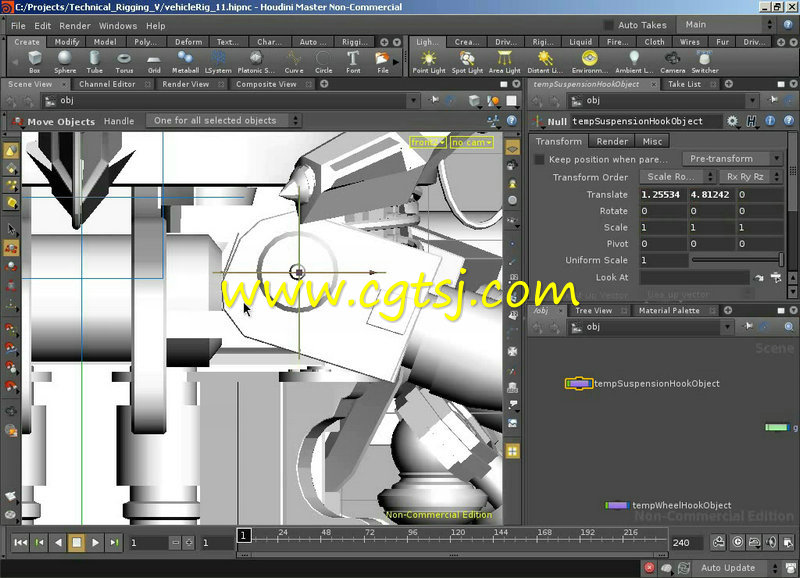
英文简介,详情点击这里if (!getcookie('tpgao_fold_cookie')) {showTip($('fold_button_2911246_fold1'));}英文简介,详情点击这里3DBuzz Technical Rigging Houdini Volumes 1-5Technical Rigging IWelcome to Technical Rigging I, the first volume of the Houdini Technical Rigging Series. In this volume, we introduce you to some of the foundational elements of the rigging process, helping you learn the basics of rigging your own characters and creations in Houdini! The volume begins with an overview of the process of rigging itself, discussing the role of rigging in a production pipeline. From there, the lecture then covers the process of bone creation and the workflow for using bones in Houdini, allowing the viewer to create skeletal systems for their rigs. Next, we take things a step further, showing you how interfaces can be layered onto your bones, allowing for direct Forward Kinematic (FK) control over the skeletal system!But things don’t stop there! We push the technical aspect to the next level by showing you how you can use the Python programming language to create your own customized tool for automatic generation of skeletal control objects, allowing you to jump start your skill set as a true tool-developing technical director!Finally, we bring it all together by showing you how the entire process can be applied to create a custom animation rig for a 3D model of a spider!Note: This video assumes basic knowledge of programming with the Python programming language!Technical Rigging IIWelcome to Technical Rigging II, the second volume of the Houdini Technical Rigging Series! This volume focuses on the process of “capturing” in Houdini, which is commonly referred to as “skinning” in many other 3D applications. We will show you the complete process of capturing your geometry to your rig using both manual means as well as the Capture Geometry Tool. In doing so, you’ll gain a more intimate understanding of how the Capture Geometry Tool actually goes about working with your skeleton and your geometry and helping you to see how best to use it to capture your geometry in the futureYou will get to see a great deal of technical whiteboard-style lecture that shows you exactly what is taking place under Houdini’s hood when using the Capturing system. In overview, the course of the lecture spans not only the application of Capturing, but also several means of control and adjustment for vertex weighting of your captured geometry, as well as how you can mirror your capture work to the opposite side of your model. We also look at even more technical applications of the capturing process, by demonstrating the use of multiple blends between different layers of capture data. In this way, the artist is given full control over choosing and blending between a variety of different capture setups, allowing for highly customizable control and deformation!Along the way, you’ll learn about some new Surface Operators (SOPs) including the Capture SOP and the Deform SOP. You will also be introduced to Capture Regions, Deform Regions, and both Point and Detail Capture attributes. Next, we show you how to work with the Edit Capture Regions Tool and how it can be used to adjust the area of effect for each Capture Region quickly and easily. We also demonstrate and explain the use of the Align Capture Pose Tool, which provides the ability to synchronize Deform Regions to Capture Regions, or vice versa.Other topics covered in the lecture include the use of the Edit Capture Weights Tool and the Capture Override SOP, allowing you to manually edit the individual vertex weights of your captured geometry through the use of intuitive handles or precise spreadsheets. We’ll also show the more organic method of weight adjustment with the Paint Capture Layer Tool and its associated Capture Layer Paint SOP.Once you see these weight placement and adjustment methods, we’ll move on to show you the Mirror Capture Weights Tool and the Capture Mirror SOP, allowing you to send your capture information to the opposite side of your model! We’ll carefully walk you through the multiple behaviors of the mirroring system, allowing the viewer to be able to select the right behavior for their individual task. Once done, we’ll show you the Edit Capture Blends Tool, which allows you to easily blend between different capturing setups, creating a final result out of a weighted combination of several capture scenarios!Technical Rigging IIIWelcome to Technical Rigging III, the third volume in 3D Buzz’s Houdini Technical Rigging Series! This new volume in the Technical Rigging Series focuses primarily on Inverse Kinematics (IK) and their use in rig setups. We will begin by introducing you to the concept of IK itself, building off of the FK concepts presented in Technical Rigging I, and showing you the key differences between the IK and FK systems. Next, we’ll show you how to set up IK solutions on your rig, demonstrating the various additional parameters that provide more control over the IK system itself.Once you have the basics in place, we’re going to move on to more technical features of IK setups including introductions to the additional two IK solver systems available in Houdini, being IK With Constraints and the Follow Curve Solver. We’ll then push your technical problem solving skills further by showing you how you can have multiple IK handles drive a single bone chain, and how you can create systems that allow you to blend between these IK handles using either the Object context or CHOPs context! While working in CHOPs, you will also learn how to limit the rotation of your bones between specified values whilst working outside of the IK With Constraints Solver.You’ll also see how to use the Python programming language to create your own rigging tools. The first of these is a simple IK system that allows the user to specify a start and end bone, with the IK being automatically created upon this user specification. Once you have created this basic system, you will see how to really take your Python programming and technical tool development skills to the next level and beyond by creating an FK/IK blending system. This process will begin by analyzing the existing method for FK/IK blending, the Pose Tool. From there, we will discuss how we can draw inspiration from that tool to design our own blending paradigm by implementing FK-to-IK matching and vice-versa, as well as using Python to create our own FK/IK blending tool! We’ll also cover the process of creating custom alterations to this system to satisfy the requirements of an animator or artist!Note: This video assumes basic knowledge of programming with the Python programming language!Technical Rigging IVWelcome to Technical Rigging IV, the fourth volume in 3D Buzz’s Houdini Technical Rigging Series! This very programming-oriented volume introduces the viewer to some more advanced rigging concepts, including stretchy IK, stretchy splines, and dynamically driven curves!We’ll begin by carefully defining and explaining each of these concepts using intensive whiteboard-based lecture, focusing on why you may need each one and some of the key technical aspects of applying them to your rigs. The basic idea is to make sure that the viewer is very comfortable with each system and the direction we plan to take for its development before jumping into the actual creation process. From there, we’ll use the Python programming language to automate the process of actually applying each concept to our rigs. For instance, we’ll show you how to create a tool that will automatically resize the bones along a chain to correspond to the length of an IK curve, allowing for stretchy results. We will also show how to create alternate versions of the tool based on whether you would like to automatically generate curve control handles for easier animation.One of the primary focuses of this video is on the actual workflow of a professional technical director. Each topic will start with careful definition and explanation of exactly the type of system we want to create. During this briefing, you will see how each required element is laid out and designed beforehand, with the actual scripting work taking place only after the design and explanation process is complete. This process will prove invaluable to anyone planning on entering the technical direction fields, as it helps to show how to approach each technical problem and identify how one can go about creating the necessary system.Note: This video assumes basic knowledge of programming with the Python programming language!Technical Rigging VAct now and get the fifth volume in the Technical Rigging series for free! This fifth volume of the Technical Rigging series shows you how to push your rigging skills to all new heights as you set up an automatic traveling system and control rig for a complex vehicle! See how you can set up a vehicle to follow the contours of the ground, as well as automatically handle wheel spin, steering, suspension, and segmented chassis control, just by animating a master control object!The fifth volume in 3D Buzz’s Houdini Technical Rigging Series, focuses on the creation of a complex vehicle rig and automation system for vehicle control. This amazing DVD can be yours for free simply by purchaing the Houdni Technical Rigging Bundle: Volumes I-IV! Keep reading for more info…The vehicle is a six-wheeled rover, whose features include independent suspension for each wheel, a steering system, working pistons, a fully controlled armature with a grasping claw, and a dual-sectioned chassis with independent motion between the front and back sections. As an added bonus, we’ll also show how you can use the skills from Technical Rigging Volume IV to create dynamic hoses that connect between areas of the vehicle.Best of all, every feature of our vehicle will be fully automated as a part of the rig! This means that an animator has only to animate the motion of a single master control, and then the rig will automatically simulate the resulting vehicle motion! The vehicle will automatically flow along the surface of the terrain, matching the topography of rolling hills and valleys with tires that accurately roll at all times. On top of this, all vehicle behavior – including suspension, steering, compression of springs and hydraulics – is created automatically as a part of the simulation process.The underlying concept behind the video is the creation and implementation of modular rigging setups, allowing portions of the rig to be easily added and reused, thereby speeding up and simplifying our workflow. We’ll also show how the rig itself can be decoupled from the geometry of the vehicle, meaning that the rig could be applied to any other similar vehicle merely by linking new geometry to it. Another vital topic will be the creation of automation systems, allowing portions of the rig to be animated through simulation rather than tedious keyframing of individual systems. We will also show how the entire creation – the vehicle geometry, the rig and its automation system – can all be combined together into a single Houdini Digital Asset for easy use in a future production pipeline.